As an Amazon Associate, we earn from qualifying purchases. Some links on this site are affiliate links at no extra cost to you. Our recommendations are based on thorough research and editorial judgment.

10 Best Wall Repair Kits Homeowners Swear By for Perfect Finishes
For perfect finishes, consider these top wall repair kits: Gorilla Wall Repair Kit features 8oz of spackling, four self-adhesive patches, and three putty knives. The 3M Small Hole Repair Kit efficiently handles holes up to 3 inches. The Wall Repair Kit (12.2oz) is an all-in-one solution, while the Romeda Drywall Patch Kit guarantees seamless finishes. Bates Choice offers 16 pieces, with varying patch sizes. Each kit boasts essential tools and fast-drying compounds, streamlining your repair process. Keep reading to uncover all the details.
Key Takeaways
- Gorilla Wall Repair Kit offers fast drying, paintable in 15 minutes, ideal for various wall damages, ensuring a smooth finish without extra sanding.
- 3M Small Hole Repair Kit is perfect for minor repairs, efficiently fixing holes up to 3 inches without shrinking, cracking, or sagging.
- Wall Repair Kit (12.2oz) provides an all-in-one solution, requiring no mixing, suitable for multiple surfaces with easy application for any skill level.
- Romeda Drywall Patch Kit features diverse patch sizes and clear instructions, guaranteeing reliable, seamless repairs in various environments like kitchens and offices.
- Bates Choice Drywall Repair Kit includes robust aluminum patches in multiple sizes, ensuring durability and ease of installation for various wall damage types.
| Gorilla Wall Repair Kit with Spackling & Primer |  | Best Fast-Drying Formula | Included Tools: 3 putty knives, sanding block | Repair Patches: 4 self-adhesive patches | Adhesive Type: Self-adhesive | VIEW LATEST PRICE | Read Our Analysis |
| 3M Small Hole Repair Kit (SHR-SIOCKIT) |  | Quickest Repair Solution | Included Tools: 3 putty knives, sanding sponge | Repair Patches: 4 self-adhesive patches | Adhesive Type: Self-adhesive | VIEW LATEST PRICE | Read Our Analysis |
| Wall Repair Kit (12.2oz) with Putty and Patches | 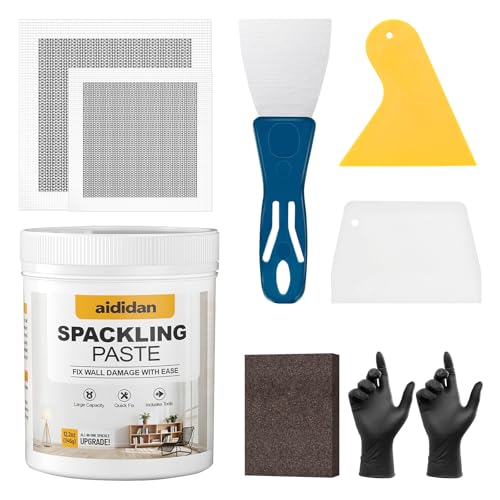 | Most Comprehensive Kit | Included Tools: 1 putty knife, sandpaper, scrapers, gloves | Repair Patches: 2 patches (2-inch, 4-inch) | Adhesive Type: Direct application (no mixing) | VIEW LATEST PRICE | Read Our Analysis |
| Romeda Drywall Patch Kit (11 Pack) | 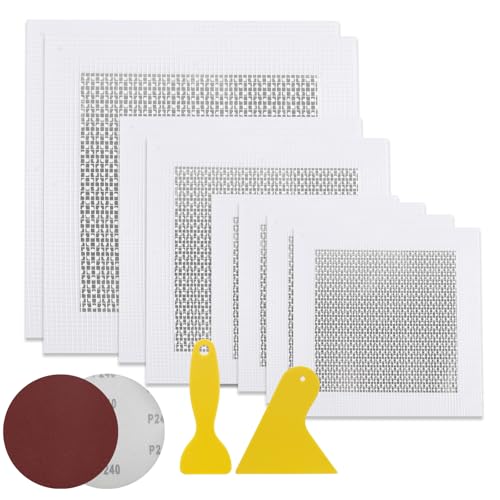 | Best Patch Variety | Included Tools: 2 plastic scrapers, 2 sheets of sandpaper | Repair Patches: 11 patches in various sizes | Adhesive Type: Self-adhesive | VIEW LATEST PRICE | Read Our Analysis |
| Bates Choice Drywall Repair Kit (16pcs) | 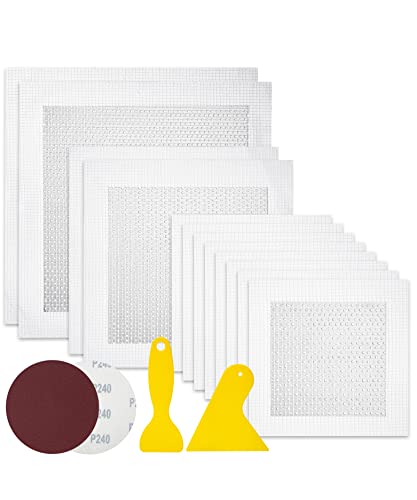 | Durable Aluminum Patches | Included Tools: 2 plastic scrapers, 2 sheets of sandpaper | Repair Patches: 12 patches in various sizes | Adhesive Type: Self-adhesive | VIEW LATEST PRICE | Read Our Analysis |
| 10 Pack Drywall Repair Kit for Large Holes | 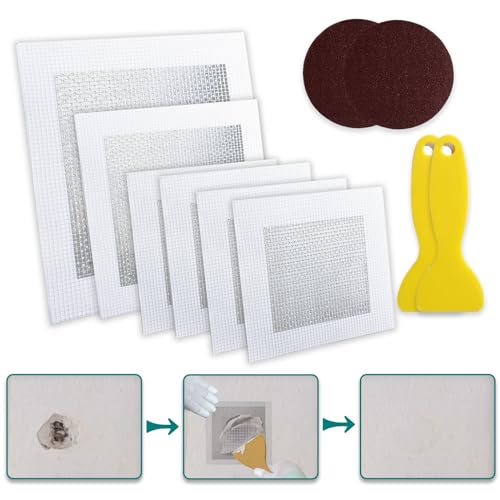 | Ideal for Large Repairs | Included Tools: 2 scrapers, 2 sandpapers | Repair Patches: 6 patches in various sizes | Adhesive Type: Self-adhesive | VIEW LATEST PRICE | Read Our Analysis |
| Drywall Repair Kit – 2 Pack Wall Patch Agent | 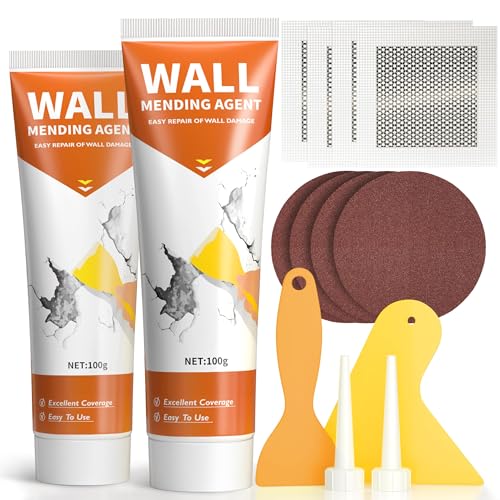 | Easiest Application Process | Included Tools: Putty scraper, sandpaper | Repair Patches: 1 wall patch included | Adhesive Type: Self-adhesive wall patch | VIEW LATEST PRICE | Read Our Analysis |
| Professional All-in-1 Drywall Patch Repair Kit | 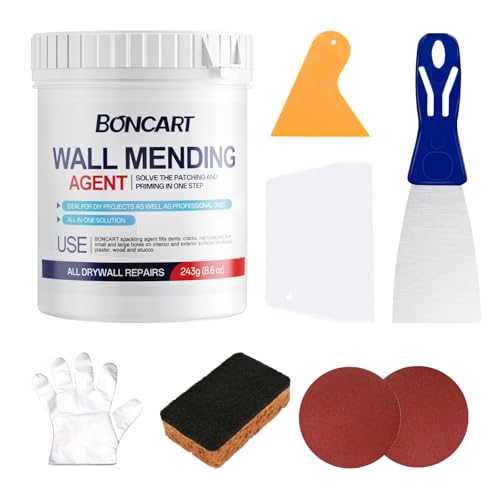 | All-in-One Convenience | Included Tools: 3 scrapers, sandpaper, gloves | Repair Patches: No specific patches listed, but all-in-one solution mentioned | Adhesive Type: Ready-to-use without mixing | VIEW LATEST PRICE | Read Our Analysis |
| Drywall Repair Kit with Aluminum Patches (13 Piece) | 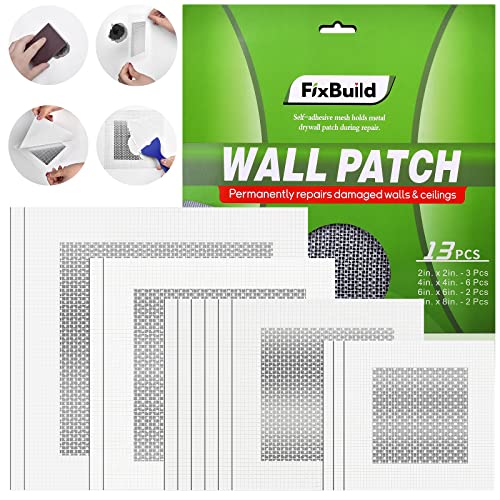 | Strong Adhesive Performance | Included Tools: No specific scrapers listed, but patches included | Repair Patches: 13 wall repair patches in various sizes | Adhesive Type: Self-adhesive | VIEW LATEST PRICE | Read Our Analysis |
| Drywall Repair Kit 20 Pack with Mesh Patches | 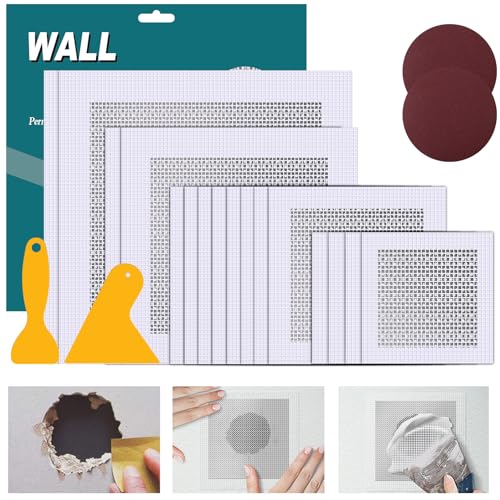 | Great for DIYers | Included Tools: Scraper included | Repair Patches: 20 aluminum wall repair patches | Adhesive Type: Self-adhesive patches | VIEW LATEST PRICE | Read Our Analysis |
You may be interested


More Details on Our Top Picks
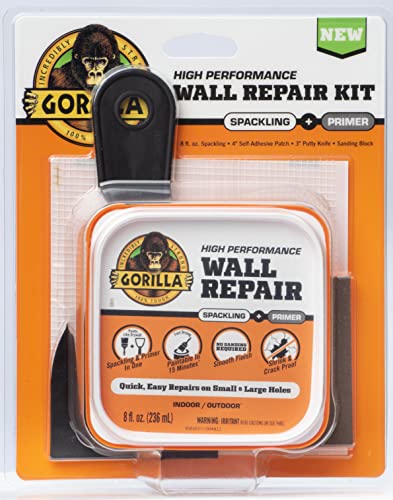
Gorilla Wall Repair Kit with Spackling & Primer
The Gorilla Wall Repair Kit with Spackling & Primer is an ideal choice for DIY enthusiasts and homeowners who want an efficient solution for wall damage repairs. This kit includes an 8-ounce tub of spackling and primer, four self-adhesive patches, three putty knives, and a sanding block. Start by cleaning the surface thoroughly and, if needed, sand the edges. Adhere the patch over the hole, applying the spackling compound smoothly with a putty knife. This fast-drying formula is paintable in just 15 minutes. It’s lightweight, shrink-proof, and guarantees a smooth finish, eliminating the need for extra sanding. Perfect for any wall repair!
- Included Tools:3 putty knives, sanding block
- Repair Patches:4 self-adhesive patches
- Adhesive Type:Self-adhesive
- Suitable Surfaces:Indoor and outdoor walls
- Application Method:Clean, apply patch, use putty knife
- Drying Time:Paintable in 15 minutes
- Additional Feature:Paints like drywall
- Additional Feature:Fast drying (15 minutes)
- Additional Feature:Smooth finish, no sanding
Recommended Products

ALL IN ONE WALL REPAIR KIT: Contains all of the tools you need to complete strong, durable repairs on walls, ceilings and both small and large holes for a fast, professional-looking finish

Drywall repair kit can be used for repairing interior or exterior surfaces like drywall, plaster, wood, brick and stone
Complete Repair Kit: Contains 1 pieces repair putty(8.5oz), 2 inch wall repair patches(2pcs), 4 inch wall repair patches(1pcs), 2 pieces of sandpaper, and 4 plastic scrapers.
3M Small Hole Repair Kit (SHR-SIOCKIT)
For those tackling minor wall damage, the 3M Small Hole Repair Kit (SHR-SIOCKIT) stands out as an ideal solution. This kit handles holes up to 3 inches in diameter efficiently, making repairs three times faster than traditional methods. You’ll find an 8-ounce tub of primer-enhanced spackling compound, four self-adhesive patches, and three putty knives included. The sanding sponge helps achieve a professional finish. To use, apply the spackling compound over the patch with a putty knife, then sand lightly after it dries. This easy-to-use kit guarantees no shrinking, cracking, or sagging—perfect for all your small holes.
- Included Tools:3 putty knives, sanding sponge
- Repair Patches:4 self-adhesive patches
- Adhesive Type:Self-adhesive
- Suitable Surfaces:Walls (drywall)
- Application Method:Clean, adhere patch, apply compound
- Drying Time:Fast drying, quicker than traditional spackling
- Additional Feature:Fixes holes up to 3 inches
- Additional Feature:Three times faster repairs
- Additional Feature:Includes angled sanding sponge
Recommended Products
MAKES REPAIRS 3X FASTER than traditional vinyl spackling
FLEXES AND ADHERES behind wall for professional results
9-in-1 Drywall Repair Kit: This complete kit includes 2× 100g (3.53oz) repair paste, 2× extended nozzles, 1× scraper, 2× 5-inch sandpapers (240 grit), 1× painter’s tape, and 1× disposable gloves, providing all the essential tools needed to repair drywall, plaster, ceilings, cracks, holes, dents, and small surface imperfections. Ultimate all-in-one dry wall hole fill kit for fixing common wall damage, ensuring a smooth, seamless, and long-lasting finish with ease.
Wall Repair Kit (12.2oz) with Putty and Patches
If you’re tackling home repairs or working on a professional project, the 12.2oz Wall Repair Kit with Putty and Patches stands out as a top choice. This all-in-one solution contains everything you need for wall repairs, including putty, two patch sizes, and essential tools like a sanding block and putty knife. Use it to fix dents, cracks, and nail holes on drywall, plaster, wood, or stucco. Apply the putty directly from the can—no mixing required! Enjoy a user-friendly experience, perfect for both new and experienced DIYers. Plus, you’re backed by high-quality customer support if you need assistance.
- Included Tools:1 putty knife, sandpaper, scrapers, gloves
- Repair Patches:2 patches (2-inch, 4-inch)
- Adhesive Type:Direct application (no mixing)
- Suitable Surfaces:Various surfaces (drywall, plaster, wood, stucco)
- Application Method:Apply wall putty directly
- Drying Time:No specific time listed
- Additional Feature:No mixing required
- Additional Feature:Suitable for various surfaces
- Additional Feature:Complete toolset included
Recommended Products
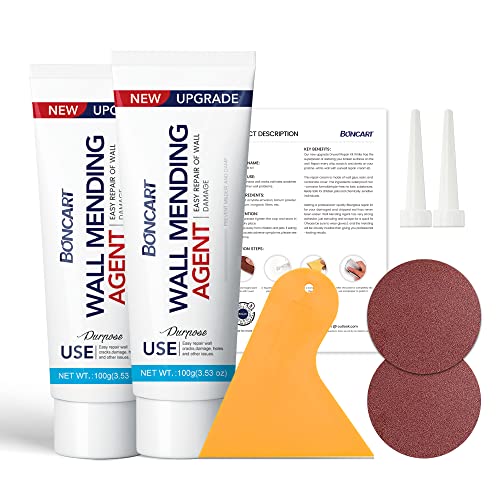
All-in-One Repair Solution:BONCART Wall Mending Agent combines patching and priming in one step, eliminating multiple product purchases. Perfect for both DIY enthusiasts and contractors to save time on drywall repairs.
【Multifunction Drywall Repair Kit】 Our Drywall Repair Kit can help you easily restore your broken surface on the wall. Plaster Wall Repair Kit can fix holes, cracks, chips, scratch and dents on wall. You can smooth it out easily because the material is very delicate, and it will become very strong when it dry out.
UPGRADE PACKAGE WITH TOOLS NEEDED - This wall hole patch kit includes: 1 Repair Putty(9.8oz), 2pcs 2"+1pcs 4" aluminum repair patch and 4pcs scrapers+2pcs sandpaper , all tools needed have been ready for you.
Romeda Drywall Patch Kit (11 Pack)
Looking for a reliable solution to mend your walls? The Romeda Drywall Patch Kit (11 Pack) offers an effective way to tackle damages. It includes four 4-inch patches, two 6-inch patches, and one 8-inch patch, ensuring you have sizes for any job. Start by cleaning the hole and selecting a patch. Peel off the backing, then press it firmly into place. Apply the spackling compound over the patch. Wait 48 hours for it to dry, and sand it flat using the included sandpaper. This kit works well in kitchens, offices, or factories, giving you a seamless finish every time.
- Included Tools:2 plastic scrapers, 2 sheets of sandpaper
- Repair Patches:11 patches in various sizes
- Adhesive Type:Self-adhesive
- Suitable Surfaces:Various wall types
- Application Method:Clean, apply patch, spackle
- Drying Time:Not specified
- Additional Feature:Lightweight yet high-strength
- Additional Feature:Thermal insulation properties
- Additional Feature:Moisture-proof adhesive backing
Recommended Products
DryDex is a latex polymer spackle for repairing interior or exterior surfaces like drywall, plaster, wood, brick and stone
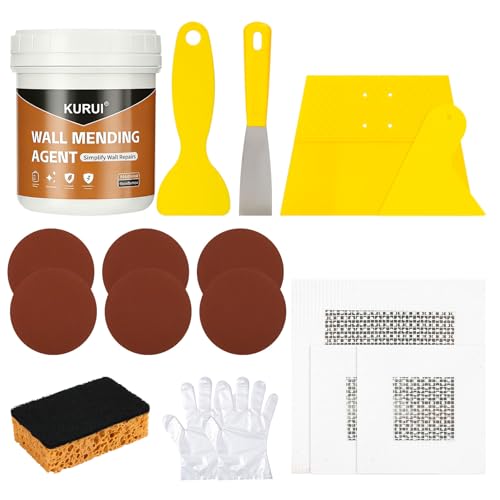
COMPLETE DRYWALL REPAIR KIT-The kit includes 1 pack 8.8oz wall mending agent, 1 textured sponge,6 sanding sheets,2pcs 2-inch wall repair patches, 1pc 4-inch wall repair patches, 4 scrapers in different sizes, and 1 pair gloves.

Package includes 12 pieces of drywall repair patch in three different sizes (8 pieces of 4-inch, 2 pieces of 6-inch and 2 pieces of 8-inch), 2 pieces of sandpaper (240 grit), and 2 plastic scrapers.
Bates Choice Drywall Repair Kit (16pcs)
The Bates Choice Drywall Repair Kit (16pcs) stands out as a top choice for DIY enthusiasts and professionals alike, thanks to its extensive assortment of 12 self-adhesive drywall repair patches in three different sizes: 4-inch, 6-inch, and 8-inch. These patches are made from quality aluminum, ensuring they’re lightweight yet strong for durability. Before application, clean and dry the damaged area thoroughly. Then, peel the backing and stick the patch over the hole. Use one of the included scrapers to spread plaster evenly across the patch for a seamless finish, achieving excellent adhesion on various surfaces throughout your home or office.
- Included Tools:2 plastic scrapers, 2 sheets of sandpaper
- Repair Patches:12 patches in various sizes
- Adhesive Type:Self-adhesive
- Suitable Surfaces:Various surfaces (homes, offices)
- Application Method:Clean, apply patch, spread plaster
- Drying Time:Not specified
- Additional Feature:Quality aluminum patches
- Additional Feature:Good adhesion guaranteed
- Additional Feature:Ideal for industrial facilities
Recommended Products
All-in-One Wall Repair Kit: This 16-piece drywall repair kit includes repair putty, scrapers, sanding tools, and self-adhesive patches, offering a complete solution for wall repair. Whether you're fixing drywall cracks, nail holes, stains, or peeling paint, our spackle wall repair kit ensures a smooth and flawless finish
All-in-one, mess free drywall repair with no spackling, sanding or tools required
The drywall repair kit includes 2x Wall mending agent (100g), 2x Nozzle Extender, 1x Scrapers, and 2x Sandpaper.
10 Pack Drywall Repair Kit for Large Holes
For DIY enthusiasts and homeowners tackling wall damage, the 10 Pack Drywall Repair Kit for Large Holes delivers an efficient solution. This kit includes four 4×4 inch patches, one 6×6 inch patch, and one 8×8 inch patch. Lightweight aluminum guarantees your repairs are durable and resistant to rust. Start by sanding the damaged area with the provided sandpaper, and clean it thoroughly. Next, apply the self-adhesive patch to the hole and cover it with the supplied drywall mud. Use the scraper to smooth the surface, then polish the edges for a seamless finish. It’s that simple!
- Included Tools:2 scrapers, 2 sandpapers
- Repair Patches:6 patches in various sizes
- Adhesive Type:Self-adhesive
- Suitable Surfaces:Various wall types
- Application Method:Clean, apply patch, cover with drywall mud
- Drying Time:Not specified
- Additional Feature:Rust-resistant aluminum patches
- Additional Feature:User-friendly for DIY
- Additional Feature:Suitable for large holes
Drywall Repair Kit – 2 Pack Wall Patch Agent
Ideal for homeowners and DIY enthusiasts, the Drywall Repair Kit – 2 Pack Wall Patch Agent simplifies wall repairs with its user-friendly design. Each kit contains 100g of wall repair paste, nozzle extenders, a plastic putty scraper, sandpaper, and a wall patch, providing everything you need. Start by squeezing the white putty into the hole or crack, then scrape smooth. Allow it to dry before sanding for a seamless finish. The kit’s fast-drying formula guarantees durability, protecting against future cracks. Store it between -2°C and 45°C for peak performance. You’ll enjoy efficient repairs without the hassle!
- Included Tools:Putty scraper, sandpaper
- Repair Patches:1 wall patch included
- Adhesive Type:Self-adhesive wall patch
- Suitable Surfaces:Plaster wall and suitable for apartments
- Application Method:Squeeze, scrape, dry, and sand
- Drying Time:Fast drying properties
- Additional Feature:Fast drying putty
- Additional Feature:Ideal for plaster walls
- Additional Feature:Nozzle extenders included
Professional All-in-1 Drywall Patch Repair Kit
Need to tackle wall imperfections quickly and efficiently? The Professional All-in-1 Drywall Patch Repair Kit is your solution. This 8.6oz kit combines patching and priming in one easy step, saving you time. It’s perfect for repairing dents, cracks, and nail holes on various surfaces like drywall, plaster, wood, and stucco.
Your kit contains a premium wall putty, three scrapers, a textured sponge, two sandpaper sheets, and gloves. Apply the paste directly using these tools. It dries tack-free in just 60 minutes, and an illustrated guide helps you with the repair process. Customer support is available for any issues.
- Included Tools:3 scrapers, sandpaper, gloves
- Repair Patches:No specific patches listed, but all-in-one solution mentioned
- Adhesive Type:Ready-to-use without mixing
- Suitable Surfaces:Various surfaces (drywall, plaster, wood, stucco)
- Application Method:Apply paste directly with included tools
- Drying Time:Dries tack-free in 60 minutes
- Additional Feature:Combines patching and priming
- Additional Feature:Dries tack-free in 60 minutes
- Additional Feature:Illustrated repair guide included
Drywall Repair Kit with Aluminum Patches (13 Piece)
Discover how the Drywall Repair Kit with Aluminum Patches (13 Piece) simplifies wall repairs for DIY enthusiasts and homeowners tackling various projects. This kit includes three 2×2-inch, six 4×4-inch, two 6×6-inch, and two 8×8-inch aluminum patches. To start, clean the damaged area thoroughly. Choose the patch size that fits the hole, peel off the backing paper, and press it firmly into place. Use the included self-adhesive tape for added stability. Apply putty over the patch, wait 48 hours for it to dry, and finish by sanding for a smooth surface. For assistance, the brand provides 24/7 customer support.
- Included Tools:No specific scrapers listed, but patches included
- Repair Patches:13 wall repair patches in various sizes
- Adhesive Type:Self-adhesive
- Suitable Surfaces:Various surfaces
- Application Method:Clean, choose patch, stick, spackle
- Drying Time:Not specified
- Additional Feature:Durable glass fiber tape
- Additional Feature:24/7 customer support available
- Additional Feature:Strong adhesive bonding
Drywall Repair Kit 20 Pack with Mesh Patches
For homeowners and DIY enthusiasts alike, the Drywall Repair Kit 20 Pack with Mesh Patches stands out as a reliable solution for effectively tackling wall damage. This kit includes eight 4×4-inch, two 6×6-inch, and two 8×8-inch aluminum patches. Each patch features extended self-adhesive mesh for superior adhesion. To apply, clean and dry the damaged area thoroughly. Then, peel the backing off a patch and firmly place it over the hole. Use a scraper to spread plaster evenly over the patch. It’s ideal for various settings whether it’s your kitchen or an office, ensuring effective repairs wherever needed.
- Included Tools:Scraper included
- Repair Patches:20 aluminum wall repair patches
- Adhesive Type:Self-adhesive patches
- Suitable Surfaces:Various surfaces (homes, offices)
- Application Method:Clean, apply patch, spread plaster
- Drying Time:Not specified
- Additional Feature:Extended self-adhesive mesh
- Additional Feature:Quality guarantee provided
- Additional Feature:30-day return policy


Factors to Consider When Choosing a Wall Repair Kit
When choosing a wall repair kit, consider various essential factors for the best results. Think about compatibility with the repair type you’re handling and the surface material at play, as these affect your repair’s durability and aesthetics. Don’t overlook ease of application, included tools variety, and how quickly the materials dry, as these can greatly impact your overall project efficiency.
Repair Type Compatibility
Choosing the right wall repair kit starts with understanding the type of damage you need to fix, as each kit is tailored to specific repair scenarios. Assess whether you’re dealing with small holes, cracks, or larger wall damage, since different kits address these issues differently. Check the kit’s compatibility with surface materials such as drywall, plaster, wood, or stucco. Review the maximum hole size it can repair; while some kits handle small openings, others are better suited for larger patches. Look for kits that include essential tools like putty knives and sanding sponges to guarantee you have everything for a successful repair. Consider additional features, like fast-drying compounds, to speed up your project and ease the process.
Ease Of Application
Understanding ease of application is essential for effectively using a wall repair kit, since the right features can make repairs straightforward and less time-consuming. Look for kits containing all necessary tools like putty knives and sanding sponges, ensuring you have everything at hand. Choose pre-mixed compounds to skip the mixing process, providing consistent results. Self-adhesive patches allow you to apply directly to damaged areas without additional glue, saving time. Opt for products with clear instructions or visual guides, making it easier for users of any skill level. Fast-drying formulas that require minimal sanding streamline the process, reducing labor. These features make wall repairs manageable, allowing you to achieve professional finishes quickly and efficiently.
Included Tools Variety
Selecting the right wall repair kit can greatly impact your repair outcomes, especially regarding the variety of included tools. Confirm your kit contains essential items like putty knives, sanding sponges, and scrapers, as these facilitate smooth application and finishing. Look for self-adhesive patches that simplify covering holes, eliminating the need for extra adhesives. Having different patch sizes is vital for effective coverage over both small dents and larger damage. A thorough kit should also include gloves for protection and a guiding manual for beginners. Finally, consider kits offering primer-enhanced spackling compounds, which streamline your repair process by reducing multiple application stages, making your work quicker and easier.
Drying Time Efficiency
Drying time efficiency is a critical factor when considering a wall repair kit, as it directly affects how quickly you can complete your project. Some spackling compounds dry fast enough to be paintable in just 15 minutes under ideal conditions. However, remember that temperature and humidity levels are essential, with higher humidity typically slowing down the process. Opt for fast-drying formulations for convenience; they minimize disruption in your space. Check for products with self-adhering properties, as these can enhance bonding and quicken drying time. For the best results, always apply kits at temperatures above 40°F to guarantee proper curing and adhesion. Be mindful of these factors to achieve a seamless finish effortlessly.
Surface Material Suitability
When you start a wall repair project, matching the repair kit to your wall’s surface material is vital for achieving lasting results. Different kits cater to specific surfaces like drywall, plaster, wood, and stucco, so pay attention. For drywall, lightweight spackling compounds work best, while plaster requires thicker mixtures. Choose compounds that enhance adhesion on porous surfaces if that’s your wall type. Additionally, kits with self-adhesive patches provide excellent hold, especially for tighter repairs. If you’re tackling multiple surfaces in your home, consider a versatile kit explicitly labeled for various materials. By selecting the right match, you’ll guarantee a smoother repair process and a finish that looks professional and stands the test of time.
Warranty And Support
After you’ve matched your wall repair kit to the appropriate surface material, don’t overlook the importance of warranty and support options. Many kits include warranties that guarantee quality and performance, offering you peace of mind. Check if the manufacturer provides customer support via a dedicated team to address any inquiries or issues you may have during your project. Also, look for a return policy that allows you to return the kit within a specified timeframe if it doesn’t meet your expectations. Effective support features, such as illustrated guides or online resources, can be invaluable for troubleshooting challenges. Knowing these details can help you choose a kit confidently and guarantee a smoother repair process.
Frequently Asked Questions
How Do I Choose the Right Repair Kit for My Project?
To choose the right repair kit for your project, consider your wall type and damage extent. For small cracks, a lightweight spackle may suffice. For larger holes, opt for a patching compound. Check for included tools, like putty knives—typically 2-4 inches is ideal. Read instructions carefully; proper mixing ratios guarantee durability. Always select materials appropriate for interior or exterior use, as this impacts longevity and finish quality. Don’t overlook drying times.
Can These Kits Be Used for Exterior Wall Repairs?
Yes, many wall repair kits can be used for exterior wall repairs. Look for kits labeled as weather-resistant. Start by cleaning the damaged area thoroughly; remove loose paint and debris. Apply a patch compound that’s suitable for outdoor use with a putty knife. Confirm the thickness matches the wall surface. Once dried, sand it smooth, and apply primer and paint for a seamless finish. Always check label instructions for specific application requirements.
How Long Do These Repairs Typically Last?
Repairs using wall kits typically last between five to ten years, depending on various factors. To guarantee longevity, choose high-quality materials, apply the product according to manufacturer instructions, and properly prep the surface. For added durability, paint the repaired area to protect against moisture. It’s also wise to regularly check for any signs of wear or damage. Doing so helps you maintain the repair and extend its lifespan effectively.
Are These Wall Repair Kits Safe for Indoor Use?
Yes, most wall repair kits are safe for indoor use. For instance, if you’re using a spackle compound, check for low-VOC (volatile organic compounds) labels to guarantee good indoor air quality. Follow the instructions carefully: wear gloves during application, apply with a putty knife, and let it dry completely—usually 2 to 4 hours—before sanding. Additionally, warrant adequate ventilation while you’re working to clear any lingering fumes. Safety first!
Do I Need Additional Tools for These Kits?
Yes, you might need additional tools for wall repair kits. Commonly, you’ll need a putty knife, usually 4-6 inches wide, for applying compounds smoothly. A sanding block or sponge helps achieve a flush finish. If you’re repairing larger holes, consider a drywall saw or utility knife for cutting. Finally, a damp cloth assists in cleaning the area before repairing. Gather these tools before starting to guarantee a smoother, more effective repair process.