As an Amazon Associate, we earn from qualifying purchases. Some links on this site are affiliate links at no extra cost to you. Our recommendations are based on thorough research and editorial judgment.

How to Dial In Spray Pattern: Fan, Pressure, and Distance
How do you get the perfect spray pattern? It can be tricky, but adjusting a few key factors – fan, pressure, and distance – will make a world of difference.
You may be interested


Start by opening the fluid and fan controls all the way. Then, hold the spray gun about six to twelve inches from the surface. This distance is vital for achieving that smooth application you’re after.
Here’s the trick: grab some cardboard and test your spray pattern. You’re looking for a symmetrical fan shape with a wet center. If it isn’t right, don’t worry—it’s all about tweaking the settings. Adjust the air pressure between 10-30 PSI according to the thickness of your paint. Each paint type can behave differently, so don’t hesitate to experiment a bit.
So, why does this matter? Getting the spray pattern dialed in doesn’t just save you time; it also means a professional finish that you’ll appreciate. It can really make your project pop!
Remember, fine-tuning these elements often takes some patience and practice. But once you find that sweet spot, it’ll be worth it. Truth is, with each change you make, you’re inching closer to that polished look. You got this.
If you encounter any common issues while spraying, you can always refer back for more tips.
What’s the first project you’re thinking of sprucing up with your newly adjusted spray pattern?
Key Takeaways
- Adjust the fan control to achieve a symmetrical elliptical spray pattern for even coverage across the surface.
- Maintain a distance of 6 to 12 inches from the surface for optimal paint atomization and to avoid runs or dry patches.
- Test air pressure settings by starting with 25-30 PSI for primers and lower pressures for thinner paints, adjusting as needed.
- Perform a spray test on a cardboard or wood panel to examine the symmetry and evenness of the spray pattern before actual application.
- Document adjustments made during testing to refine techniques for future projects and troubleshoot any uneven paint distribution.
How to Adjust Your Spray Pattern for Optimal Painting Results

Are you struggling to get a nice finish on your painting projects? A lot of that comes down to nailing your spray pattern. It’s not just about having the right paint; it’s also about how you apply it.
First things first, make sure you’ve got your HVLP spray gun set up. Start by opening both the fluid control and fan control all the way. Then, position the gun perpendicular to the surface you’re painting, keeping it about six to twelve inches away. This is crucial for getting an even spray!
Now, you’ll want to shape your spray. Here’s the trick: adjust the fan control. If you narrow the airflow, you can shift from an elliptical spray to a round one. It’s all about finding that sweet spot that works for your project. Why does this matter? Because your fan pattern can really impact how the paint lays down.
Let’s talk air pressure. Test out different settings, but begin around what the manufacturer recommends. Keep an eye on your spray pattern. Regularly check for symmetry; you don’t want any heavy spots or weird shapes ruining your work. If something feels off, try adjusting the nozzle size or tweaking that air pressure until you get consistent coverage. Using the correct nozzle sizes matched to your project needs can significantly improve the finish quality.
Why Getting Your Spray Pattern Right Can Transform Your Painting

Have you ever finished a painting project only to realize it looks uneven and patchy? Getting your spray pattern right can really make a difference. A smooth, consistent spray is key to achieving that professional finish. When you nail the spray pattern, you ensure that the paint spreads evenly, which helps avoid those frustrating uneven spots.
Want to achieve that perfect look? Focus on two main things: atomization air and air pressure. The goal here is to create an elliptical spray shape, ensuring you have a wet center surrounded by fine droplets. This setup is especially crucial when you’re dealing with thicker paints, which might need you to tweak your settings a bit for the best results.
Here’s the trick: pay attention to your distance from the surface. Standing too close can lead to runs, while being too far away can leave you with dry patches. Regular testing is also essential. Take a moment to spray a test area and check for issues. It helps you catch problems early, saving time and paint in the long run.
So, why does this matter? When you get your spray pattern down, you’re not just improving the finish; you’re also making your life easier. It feels fantastic to see that smooth coat when all your prep work pays off. Keep experimenting with your technique, and don’t hesitate to make adjustments along the way.
In short, your spray pattern is key to a successful paint job. It’s all about practice and being mindful of the details. Additionally, using sprayers with adjustable flow control can help you customize paint output for an even better finish.
What’s one adjustment you could try on your next project?
Understanding Spray Gun Nozzle Sizes and Their Impact
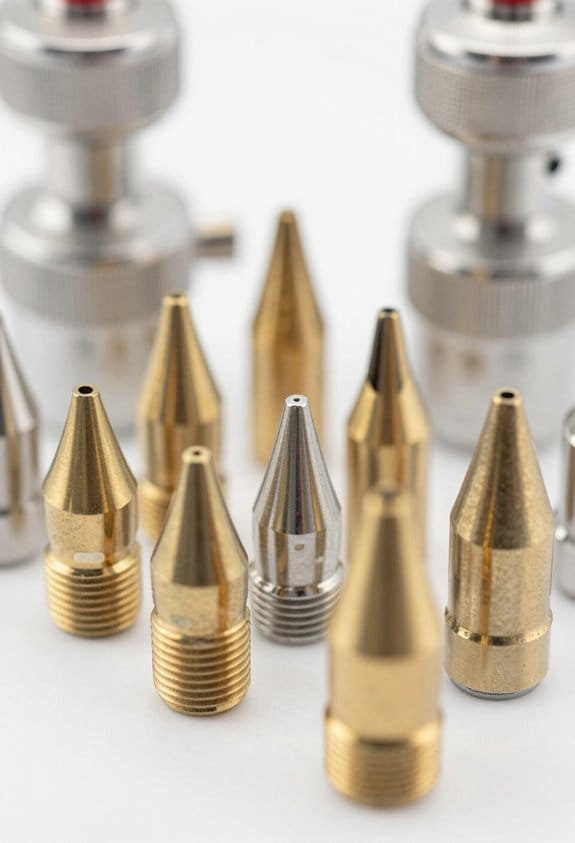
Ever pick up a spray gun and feel overwhelmed by all the nozzle sizes? You’re not alone. Picking the right nozzle size is key if you want to nail that spray pattern.
Nozzle sizes typically range from 0.5 mm to 3.0 mm, and here’s the scoop: smaller nozzles are great for those intricate details, while larger ones are perfect for bigger surfaces. So, why does this matter? If you’re dealing with thick paint, you’ll need to reach for a larger nozzle. It ensures that your paint flows smoothly and doesn’t clog up.
Now let’s talk air pressure—it’s not a one-size-fits-all scenario. Larger nozzles usually work best with higher pressures, which helps break down the paint for a fine mist. Meanwhile, smaller nozzles thrive at lower pressures, which helps you keep the details crisp while reducing overspray.
Here’s the trick: When you’re choosing a nozzle, always consider the type of project you’re working on. Your choice can significantly impact the finish.
Additionally, using interchangeable nozzles can facilitate seamless task switching, improving efficiency and ensuring optimal results.
Recommended Products


FIRE RATED FOR MAXIMUM SAFETY: Akfix Fire Rated ThermCoat Spray Foam Insulation is Class-A Fire Rated and tested to meet stringent fire safety standards such as ASTM E84,Engineered to provide enhanced fire protection in residential, commercial, and industrial applications.

COMMERCIAL GRADE PERFORMANCE: 4400 PSI and 4.2 GPM of powerful, deep cleaning water pressure perfect for decks, sidewalks, siding, fences, railings, garage floors, exterior walls, cars and patio furniture with an easy-to-fill 1.7 gallon gas tank
How Air Pressure Affects Paint Atomization and Flow
Have you ever wondered why your paint job doesn’t come out the way you envisioned? Getting the air pressure just right is crucial for a smooth finish. When it comes to paint atomization, air pressure plays a big role; higher pressure will give you a smoother finish but beware—too much can lead to overspray if you’re not careful.
For instance, if you’re using primers, sticking to about 25-30 PSI usually does the trick for good atomization. Thinner paints, on the other hand, are often fine around 10-15 PSI. So, why does this matter? Adjusting your air pressure based on environmental conditions really helps. When it’s dry and hot, you might want to lower the pressure; but when it’s humid, a bit more pressure can do wonders.
Keeping an air micrometer handy can help you monitor and fine-tune the pressure as you go. Regular adjustments can make a noticeable difference, helping to avoid issues like orange peel finishes or uneven coverage. Honestly, spending a few extra moments to dial in the pressure could save you time and frustration down the line.
In the end, getting your air pressure right is all about balance—it’s a bit of trial and error until you find what works best for you. Give it a shot and see how it affects your work! What tricks do you use to get your paint flows just right? Using sprayers with adjustable pressure settings allows for this important fine-tuning to achieve flawless finishes.
Recommended Products

✔️ECONOMICAL - The Newstripe 4250 Airless Striping Machine (P/N 10003947) is our most economical high pressure, pavement and athletic field marking machine. Weighing only 105 lbs., the 4250 shares many of great features of the 4400 and 4600, but with a more compact and lightweight design at a budget price. This makes it easy to push across the roughest pavement and athletic fields while producing bright and straight 2 inch to 6 inch wide lines.

Build a dust barrier in minutes without tape, ladders or damage

GRACO 17N266 - Finish Pro HVLP 9.0 ProContractor Series Sprayer, Stainless Steel
Finding the Right Distance for Effective Spray Application
Finding the Right Distance for Effective Spray Application
Have you ever struggled with spray painting and ended up with a mess instead of a masterpiece? Getting the right distance from the surface is crucial if you want that smooth, professional finish. Generally, you should spray from about 6 to 12 inches away. The exact distance can vary based on the type of spray gun you’re using and how thick your paint is.
Maintaining that sweet spot is so important. If you spray too close, you could end up with runs in your paint. On the flip side, being too far can lead to what’s called dry spray, which means your paint isn’t atomizing properly. The best part is, holding the gun perpendicular to the surface helps to create an even spray pattern, making your work look polished.
So, how do you know if you’ve got it right? A quick test on a scrap piece can save you a lot of time and frustration later. Just apply a few strokes and check for consistent coverage before hitting your actual project. Different materials and finishes might require you to adjust your distance, especially for those thicker paints.
Honestly, spray painting might seem straightforward, but these little details can make a big difference in your final product. The key is to keep experimenting until you find what works best for you.
In the end, remember to play around with that distance and don’t hesitate to make adjustments as needed. Using appropriate paint organizers can help keep your materials accessible and streamline your painting process. What’s your go-to tip for perfecting your spray painting technique?
Recommended Products

MAINTENANCE SPRAYER: The perfect option for even spraying of pest controlling and fertilizing liquid substances across large areas, this ATV sprayer helps in the maintenance of large commercial and agricultural spaces.

Quickly Shot-Spraying gun is equipped with 500W brushless motor & 2 premium copper nozzles, catering to various spraying requirements, air flow: 1600ml/min.

PROPERTY MAINTENANCE: Workhorse boom nozzle sprayer is preferred for administering pesticides, fertilizers, and herbicides. The agricultural sprayer is useful for quickly covering smaller plots. It can be easily configured to a pull-behind system that uses garden tractors or ATVs.
Best Practices for Testing Your Spray Pattern
Are you tired of spraying paint and not getting the results you envisioned? You’re not alone! Testing your spray pattern is a crucial step before diving headfirst into your main project. Trust me; it can save you a lot of headaches down the line.
So, what’s the best way to test? Start by finding some good test surfaces, like cardboard or wood panels. Set them up vertically in a well-lit spot. This setup makes it easier to see how your spray pattern really looks. It’s all about clarity!
Make sure you’re holding the spray gun at a consistent distance. Keep that nozzle perpendicular to your test surface. This little trick goes a long way. As you spray, closely examine the fan pattern. Is it symmetrical? Are the edges nice and soft? If you see any uneven areas in the paint distribution, don’t just ignore them. It might be time to tweak the Air Cap or bump up the air pressure a bit.
And don’t forget to jot down all the adjustments you make. Whether it’s nozzle sizes, air pressure settings, or spray angles, recording these details will help you refine your technique for future projects. Remember, practice makes perfect!
Adjusting spray variables with adjustable flow control can significantly improve your spray pattern quality.
Recommended Products
5-Stage turbine produces 9. 5Psi
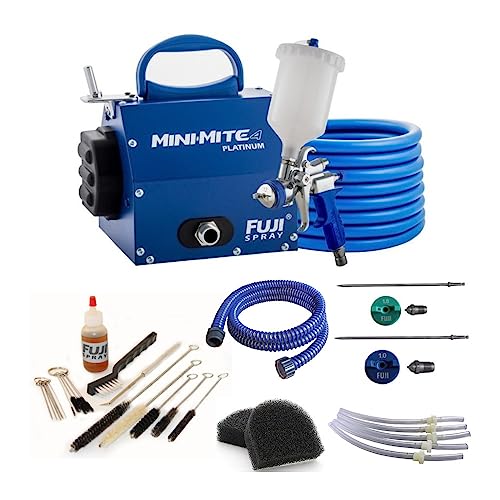
BUNDLE INCLUDES: Fuji Spray 6-Feet Flexible Whip Hose (Blue), Fuji Spray Mini-Mite 4 Platinum T75G HVLP Spray System, Fuji Spray Gun Cleaning Kit with Lubricant, Fuji Spray Air Cap Set #2 for T-Series Spray Gun, Fuji Spray Air Cap Set #5 for T-Series Spray Gun, Fuji Spray Turbine Filters for Mini-Mite Platinum Series (2-Pack), and Fuji Spray Pressure Tube Long/Check Valves (5-Pack)

Professional Spray Gun features convenient side Pattern Control Knob to adjust size of fan pattern from small to large
How to Troubleshoot Common Spray Pattern Issues
Ever had a frustrating paint job ruined by a messy spray pattern? It happens to the best of us. Let’s dive into some common issues and simple solutions that can make all the difference during your project.
If you notice a heavy coating right in the center of your spray pattern, try this: increasing the air pressure or moving a bit closer to the surface can really improve the atomization. It’s a quick fix that often leads to a smoother finish. Dark stripes showing up on your surface? That’s usually a sign of clogged air cap slots. Give those a good clean and make sure your nozzle is seated correctly.
Uneven paint distribution can be a real headache. Adjusting the spray angle might just be the trick you need to maintain consistent distance and technique. And if you’re struggling with overspray or those fuzzy edges that spoil the look, reducing airflow pressure can create a finer spray without compromising coverage.
Taking the time to regularly test and clean your spray gun really pays off, especially for future projects. Using environmentally friendly cleaning products can help maintain your equipment without harsh chemicals. So, what’s your go-to method for tackling spray pattern issues? Let’s keep the conversation going!
Recommended Products

Powerful 6-Stage Motor Produces up to 11.5psi

6 Stage Motor: Delivers exceptional power with a maximum PSI of 11.5. Allowing you to atomize virtually all coatings undiluted, ensuring even coverage and a stunning finish

Powerful 6-Stage Motor Produces up to 11.5psi
Frequently Asked Questions
What PSI Should I Run My Sprayer At?
We should aim for an ideal PSI range of 25-30 for most paints. Let’s consider sprayer performance, tip size selection, and material viscosity adjustments to fine-tune that pressure for the perfect finish.
What Pressure Should I Set My Airless Sprayer At?
Alright, folks, let’s set our airless sprayer pressure based on paint viscosity. We recommend starting between 1500 and 3000 PSI. Remember, nozzle sizes and surface preparation also influence our ideal spray gun settings for the project!
What Is the Best Air Pressure for Spray Painting?
We’ve found the best air pressure for spray painting is between 10-30 PSI, depending on paint viscosity and nozzle selection. Adequate surface preparation is essential to achieving a smooth, even finish. Let’s fine-tune together!
What PSI Should I Spray Base Coat?
In our painting journey, think of PSI as the compass guiding us. For base coat techniques, we’ll aim for 20-30 PSI, adjusting spray gun settings for ideal viscosity, ensuring those finishing touches shine perfectly.


