As an Amazon Associate, we earn from qualifying purchases. Some links on this site are affiliate links at no extra cost to you. Our recommendations are based on thorough research and editorial judgment.
How to Protect Floors When Spraying Indoors (Zones + Overlap Strategy)
Have you ever tried spraying indoors and ended up with a mess on your floors? If so, you know how important it is to protect them before diving into your project. The first step is to clear out all the furniture. Not only does this help you avoid tripping over it while you work, but it also gives you a clean slate to set up your protective gear.
You may be interested


Once you’ve moved everything out of the way, don’t skip the cleaning part. A clean floor helps keep dust and dirt from getting mixed into your spray. After that, lay down some heavy-duty drop cloths. Make sure these drop cloths extend at least two feet beyond your work area. It sounds like a lot, but trust me, it’s better than dealing with paint splatters later.
Now, when it’s time to spray, remember to overlap your strokes by at least 50%. This will help you achieve even coverage without leaving any streaks. To stay organized, try marking zones on the floor. Think of it as breaking up your space into manageable sections; it’ll help keep your spraying process smooth and clean.
So why does all this matter? If you take these steps, you’ll not only minimize the risk of damage to your floors but also create a tidier workspace. Protecting your floors doesn’t have to be a hassle. You might discover even more tips and tricks as you go along.
In summary, prep your space, lay down those drop cloths, and keep your spraying organized. What’s your go-to method for keeping things tidy during a project?
Key Takeaways
- Prepare the area by removing furniture and using sliders to avoid floor scratches during setup and painting.
- Clean floors thoroughly to enhance adhesive quality of protective coverings, ensuring they stick properly.
- Use overlapping protective materials, like canvas drop cloths, extending at least two feet beyond the spray area.
- Implement a marked grid pattern for organized spraying, ensuring you maintain a 50% overlap in each spray pass.
- Regularly check and reinforce high-traffic areas with durable materials to prevent damage and maintain safety throughout the project.
Why Is Floor Protection Essential During Indoor Spraying?

When you’re spraying indoors, it’s crucial to keep an eye on your floors. Ever spilled paint on nice hardwood or carpet? It can cause a nightmare that leads to expensive repairs. To protect your surfaces, think about some solid floor protection tactics.
Heavy-duty drop cloths and sturdy plastic sheeting can work wonders. They absorb paint and make for hassle-free cleanup. Just remember to overlap your materials and secure the edges. Why? This minimizes gaps, especially when you’re going at it with aggressive spraying techniques. It’s about more than just saving your floors; it also reduces the chances of slipping and falling, making the workspace safer for everyone.
So, what’s the best way to go about this? Try placing drop cloths in layers—this extra coverage works like a charm. And, if you spot a spill, tackle it right away. The sooner you deal with it, the less likely those paint stains will become permanent.
In short, taking proactive steps to protect your floors during indoor spraying is a smart move. Using reusable protective materials can further enhance cleanup efficiency and sustainability. Do you have your own tips for keeping things clean while working on projects like this?
Preparing the Room: Clearing Out Furniture

Protecting your floors is just part of the indoor spraying prep; getting the room ready is equally important. You don’t want to play a game of hopscotch around your furniture while trying to paint, so let’s talk about clearing out the space. Start by removing all furniture and decor—everything from rugs to lamps. These can easily become tripping hazards or fall victim to paint splatters.
For those bulky pieces, consider using sliders. They can really save your floors from scratching. Once everything’s out, group larger items together in the center of the room. This makes it easier to paint without constantly navigating around things. As a bonus, don’t forget to protect your furniture edges with cardboard or blankets. This simple step can save you from dealing with overspray later.
Establishing a clear pathway for movement is crucial. It not only keeps you safe but also helps the whole process run smoothly. So, why does this matter? Because a well-prepped space is key to achieving that perfect finish. Using durable paint trays and equipment designed for easy cleaning also helps minimize unintended messes during painting.
Cleaning Your Floors: Why It Matters

Cleaning your floors before starting that indoor spraying project is crucial. Think about it: dirt and grease can mess with adhesion, which might lead to some real headaches down the line. For hardwood floors, you’ll want to start by sweeping or vacuuming. After that, mop them with a vinegar and water solution to really kick contaminants to the curb.
Tile floors are a bit different. Grab a microfiber cloth and a cleaner safe for tiles to make sure your surface is nice and smooth for those protective coverings. And if you’ve got vinyl floors? Use a cleaner specifically made for vinyl, so you won’t run into any nasty surprises.
A solid floor cleaning doesn’t just help prevent scratches; it’s also about making sure those protective materials stick properly during your project. The best part is, taking this step sets you up for success. You don’t want to risk putting in all that hard work only to have it compromised by a dirty surface. Using clean strainers regularly during the project also prevents contamination that can affect the final finish.
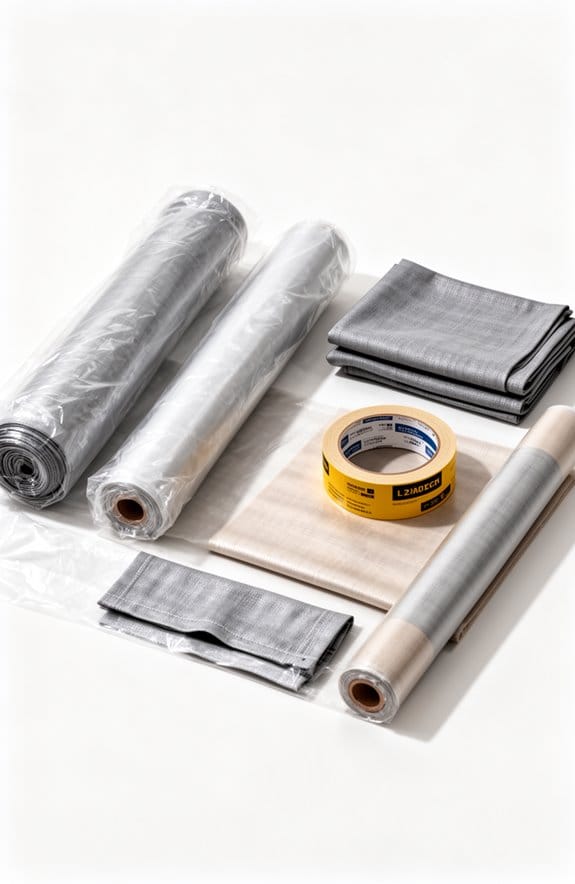
Choosing the Best Floor Protection Materials
Choosing the right floor protection materials is key to keeping your surfaces safe during indoor spraying projects. Ever had a paint spill that ruined your beautiful hardwood? It’s not a pleasant thought! For hard surfaces like laminate or tile, heavy-duty paper works well, helping resist those unexpected drips and splatters. When you’re dealing with carpets, on the other hand, you want something soft and puncture-resistant to catch any mishaps but still feel gentle underfoot.
If you’re protecting hardwood floors, polyethylene boards or even good old plywood can be your best friends. They not only add a solid layer against spills but also help with moisture resistance. And for tile floors, I’ve found that using Spriteshield is a fantastic way to cover those pesky grout lines. It ensures you’re fully shielded from potential damage.
In bustling areas where foot traffic is a given, layering materials can provide extra protection and durability. Try combining rosin paper with heavy-duty paper for a double dose of safety. This helps keep your floors looking pristine, even when friends and family are walking around, maybe even with paintbrushes in hand.
Before jumping into using any protective materials, take a moment to test them out in less visible spots. This step might seem small, but it’s crucial to avoid surprises. So, why does this matter? You really don’t want to end up with a sticky mess or damaged floors after all your hard work!
In short, protecting your floors doesn’t have to be a daunting task. Just think ahead, choose the right materials, and you’ll keep those surfaces looking great. What’s your go-to tip for protecting flooring during DIY projects? For added durability and protection, consider using a plastic drop cloth with tear resistance features to better shield floors from spills and debris.
Layering Techniques for Floor Protection
Starting an indoor spraying project can be a bit daunting, especially when it comes to protecting your floors. You’ve invested time and money in your space, and the last thing you want is to deal with paint spills or stains. So, how do you ensure your floors stay pristine?
Combining thick canvas drop cloths with plastic sheeting is a good place to start. The canvas will soak up any spills, while the plastic helps prevent seepage to the floor underneath. Make sure to tape down the edges of each layer with painter’s tape. This keeps everything secure, especially in those high-traffic areas where people are constantly moving around.
If you’re anticipating heavy foot traffic, add some plywood boards under the canvas. This gives extra support and further protects against damage. And here’s a tip: extend those protective materials at least 12 inches beyond your painting area. Why? This overlap helps prevent splatters from reaching your floors.
It’s also crucial to keep an eye on your protective layers as you work. If you notice anything looking worn or damaged, replace it quickly. Staying on top of this can save you a lot of hassle in the long run.
For the best results, use drop cloths made with double-stitched seams to ensure durability throughout your project.
How to Keep Walkways Safe and Dirt-Free
Have you ever stepped into a freshly painted area only to find your shoes covered in paint splatters? Keeping walkways safe and dirt-free during indoor spraying projects can feel daunting, but it doesn’t have to be.
To start, think about clearly marking out your main pathways. This can really help cut down on trip hazards. You can even get creative with sticky mats at entry points—these work wonders for catching dirt and debris from shoes, which helps keep those newly painted areas clean.
For the zones where people pass through frequently, consider laying down neoprene floor runners. These have non-slip backing, so they’ll stay put while providing extra grip. Just make sure you secure them well. Regularly check your walkways, too, so you can spot any spills or drips right away—this will help keep your feet paint-free.
So, why does this matter? Well, enforcing the use of shoe covers not only helps reduce the mess but also keeps parts of your workspace cleaner. Honestly, a little extra thought about your walkways can really create a safer and tidier environment for everyone involved. Adding washable and durable canvas drop cloths in high-traffic areas can further protect floors and simplify cleanup.
Mastering Overlap Strategy: Ensuring Effective Coverage
Mastering the overlap strategy is key when you want that perfect paint job indoors. Have you ever noticed streaks in your paint? That’s where overlapping your spray patterns by at least 50% really comes into play. It helps ensure you’re getting complete coverage without those annoying lines. Maintaining a distance of 12 to 18 inches from the surface is crucial too—this keeps the pressure steady and stops you from slapping on too much paint in one spot.
Here’s the trick: implement a grid method. This means moving methodically across the area—covering from one side to the other while keeping an eye on your overlaps. It not only helps you be efficient but also keeps the work organized. Don’t forget to regularly check your sprayer nozzle. That simple step can prevent uneven paint distribution, which is a real lifesaver in the long run.
Now, let’s talk about prep. Frankly, marking zones on the floor before you start spraying can make a huge difference. It keeps everything organized and helps protect your floors. You don’t want to end up with missed spots or worse—too much paint in one area. So, why does this matter? Because a little planning can lead to a much smoother finish and save you time in the end.
To recap, remember to overlap your spray patterns, keep a consistent distance, use a grid method, check your sprayer, and mark your zones. What’s the first step you’ll take in your next indoor painting project? Also, to ensure protecting your floors from paint spills, consider using specialized protective coverings designed for interior use.
How to Properly Install Floor Protection
Protecting your floors during an indoor spraying project is a must. Ever wondered why a clean floor matters? Cleaning up any dust or debris can make a world of difference in how well your protective covering sticks. Start with a thorough sweep or vacuum to ensure you’re all set.
When you’re ready, lay down canvas drop cloths or heavy-duty paper. Spread them out at least two feet beyond the area you’ll be working on. This helps catch any overspray or drips. As you do this, don’t forget to use painter’s tape around the edges. Secure those cloths to the floor and baseboards to keep everything in place. It’s essential to overlap each covering by at least half its width to ensure full protection.
In areas that are likely to see a lot of foot traffic, it’s a good idea to reinforce your setup. Try placing sturdy boards over the coverings and taping their edges down securely. Honestly, this extra step can save you from a lot of potential headaches later.
Throughout your project, take a moment to regularly check on the condition of your floor protection. If you notice any damage, replace those coverings immediately. So, why does this matter? A strong barrier against spills and drips keeps your workspace safe and clean, and that’s something you definitely want!
Additionally, choosing protective materials that are durable and chemical-resistant helps maintain the integrity of your floor protection throughout the project.
Quick recap: clean the floor, lay down your coverings, secure with tape, reinforce in high-traffic spots, and keep an eye on them. Got any floor protection tips you swear by? Let’s hear them!
Efficient Cleanup: Safety in Removal
Sure, we all want to wrap up a painting project as fast as possible, but the cleanup process deserves just as much attention. Nobody likes to deal with damage after all that hard work, right?
First things first, make sure the paint is completely dry before you peel off any protective coverings. A little patience goes a long way here. Grab a putty knife and gently score the edges of the tape to help with removal. When you pull the tape off, do it slowly at a 45-degree angle to keep the paint from lifting. It can be a little nerve-wracking, but taking your time pays off.
Sometimes you might find adhesive residue left behind. So, what do you do? Apply a bit of adhesive remover or rubbing alcohol. Just remember to test it first on a hidden area of your floor to make sure it won’t cause any damage.
Once everything’s been cleaned up, give your floors a good wipe down with a damp cloth or a cleaner that’s safe for your surface. A clean space feels so much lighter, doesn’t it?
Lastly, don’t forget about ventilation. It’s important to keep airing out the room to reduce any lingering fumes while you finish the cleanup. You want your workspace to feel fresh and safe.
Using the right tool, such as one with an efficient opening mechanism, can also prevent spills that make cleanup more difficult.
When to Call in Professional Help for Your Painting Project
When should you think about hiring professionals for your painting project? If you’re dealing with large spaces or complex architectural details, it’s a smart move to bring in professional painters. They know what they’re doing and can deliver a high-quality finish while also protecting your floors, which is crucial to avoid costly damage.
If your home was built before 1978, you definitely want to work with EPA-certified pros. They’re trained to handle any lead paint hazards, ensuring the safety of your family and home. And let’s face it: if you’re short on time, having reliable pros can really lighten the load. They can complete the work quickly and efficiently, which means less disruption to your daily routine.
Thinking about specialized techniques? If you’re considering indoor spraying or any complex methods, professionals have the right tools and experience to handle that. They’ll make sure everything’s protected and that you get the results you’re after.
Additionally, using the appropriate double-sided tape for securing protective floor coverings can provide better adhesion and prevent slipping during the painting process.
So, why does this matter? Because with the right help, you can avoid headaches and enjoy the transformation instead. Remember, it’s all about making the process smoother and getting a finish that you love.
In the end, when it comes to your painting project, don’t hang back if you need support. Sometimes a little professional help can make all the difference. What’s your next step?
Frequently Asked Questions
How to Protect Floors When Spray Painting?
To protect our flooring materials when spray painting, we should lay down sturdy protective coverings—like canvas drop cloths—and secure them well. This prevents spray paint damage and keeps our surfaces looking pristine during the project.
What Is the Rule of 3 Flooring?
When we say “a stitch in time saves nine,” understanding the Rule of 3 Flooring is essential. It involves using flooring materials like canvas and plastic as protective coverings during paint application to guarantee thorough safety.
How to Avoid Overlap Lines When Painting?
To avoid overlap lines when painting, we should use spray technique tips like maintaining consistent distance and applying overlap prevention methods. Utilizing a ‘W’ pattern helps achieve seamless finish strategies for even, beautiful results.
How Can Floors Be Protected During a Remodeling Job?
To protect floors during a remodeling job, we should use high-quality floor coverings and protective films. Let’s utilize effective tape techniques to secure everything, ensuring they stay in place and shield our floors from damage.


