As an Amazon Associate, we earn from qualifying purchases. Some links on this site are affiliate links at no extra cost to you. Our recommendations are based on thorough research and editorial judgment.
How to Remove Loose Paint Without Gouging Drywall
Removing loose paint from drywall can feel like a daunting task, especially if you worry about damaging the surface underneath. Ever had a wall that looks like it needs a facelift? Don’t stress, you can fix it without causing gouges.
You may be interested


First things first, check the wall for any underlying damage. If it’s just paint that’s peeling, you’re good to go. Here’s the trick: grab a sharp utility knife and carve a clean V indent along the loose edges. This helps the paint come off more easily without dragging along the drywall.
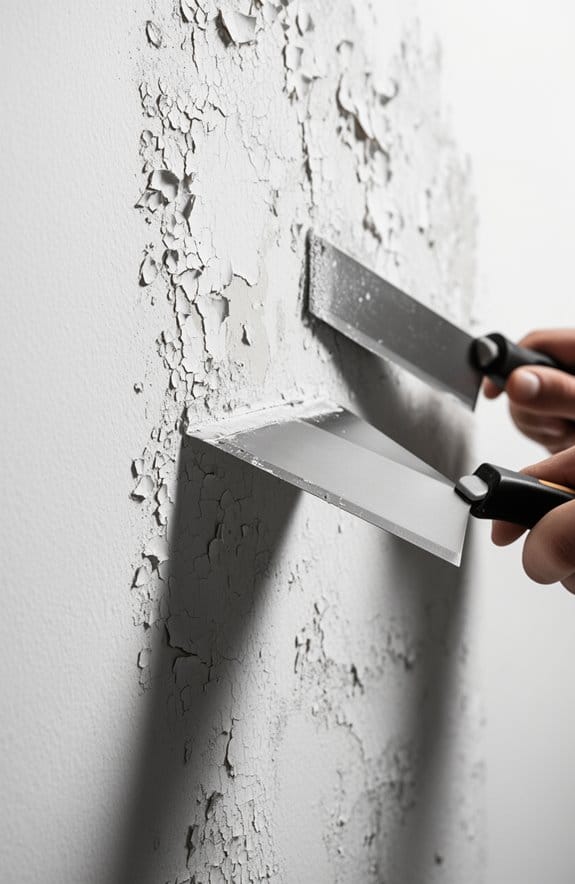
Now, when it comes to actually taking the paint off, you’ll want a chisel or a razor scraper, angled at about 45 degrees. This angle gives you better control and reduces the chance of gouging.
After you’ve cleared the loose paint, it’s time to smooth things out. Take some 80 grit sandpaper and gently sand the area until it feels even.
If you see any gouges left behind, filling them with Spackle is a great move. Once it’s dry, a skim coat of drywall mud will help create that professional finish we all want. It’s truly satisfying to see the wall transform before your eyes!
So, why does this matter? A well-prepped wall not only looks better but also ensures your new paint job lasts longer. You’re certainly going to appreciate the effort when the paint adheres properly and your walls shine.
In summary, removing loose paint without damaging your drywall is totally doable. With these steps, you’ll be on your way to giving your walls a fresh start—what project are you tackling next?
Key Takeaways
- Use a sharp utility knife to carefully cut along the edges of loose paint for cleaner removal without damaging the drywall.
- Angle a razor scraper at 45 degrees and apply even pressure to gently lift loose paint without gouging the surface.
- Start with coarse grit sandpaper to smooth out rough areas, then follow up with finer grit for a polished finish.
- Avoid excessive pressure when scraping or sanding to minimize the risk of damaging the drywall underneath.
- After removing paint, fill any gouges with Spackle and sand smooth before priming to ensure an even surface for repainting.
How to Check Your Walls Before You Remove Paint?

Have you ever started a paint removal project only to realize your walls might need more attention than you thought? Before diving in, it’s smart to take a moment and really check your walls.
First off, look for damage like peeling or bubbling paint. If you see that, it could be a sign of deeper issues lurking beneath the surface, which means you’ll need to remove the paint to get to the root of the problem. Then, take a close look at the condition of the paint itself. If it’s smooth and intact, you might not even need to strip it. And don’t forget to think about the surface material: is it drywall, plaster, or wood? Each material calls for a different approach.
You also want to know whether the existing paint is oil-based or latex acrylic. This is crucial because if you plan to switch paint types, you’ll have to remove all of the old paint for the new stuff to stick properly.
Lastly, if your home was built before 1978, please get a lead paint test done. It’s a simple step that ensures you can work safely as you move forward. Additionally, preparing surfaces properly will help improve adhesion when applying multi-surface caulk or other materials afterward.
Essential Tools and Common Challenges

Have you ever stared at chipped paint on your walls and wondered how to deal with it without wrecking the drywall underneath? It can feel pretty daunting, but with the right approach and tools, you’ll find that removing loose paint isn’t as bad as it seems.
Start by assessing your walls and making sure you’ve got your tools ready. Here’s what you need:
- A sharp utility knife: This cuts a V indent along the paint line, making it easier to get started.
- A chisel or razor scraper: This gives you better control for removing the paint.
- Various grits of sandpaper: Begin with coarser sandpaper to smooth out rough spots after scraping, and then switch to finer grades for that polished finish.
Once the paint’s gone, applying a skim coat of drywall mud will help blend everything back together. So, stick to that plan, and you should see solid results.
Of course, a few challenges might pop up while you’re working. Controlling the depth of your cuts can be tricky, and thoroughly getting rid of all the caulk can test your patience. But here’s the trick: take your time and be precise. You want to ensure you don’t damage the drywall below.
Adjusting your technique on the fly based on what the wall shows you is part of the process. Honestly, it’s more about being mindful than perfect.
Additionally, applying a quality exterior primer after removing loose paint helps protect the surface and ensures better adhesion of your new paint.
In the end, with a little patience and the right tools, you’ve got what it takes to make those walls look fresh again. So, what’s holding you back from tackling that paint project today?
Step-by-Step Paint Removal Guide

Are those pesky patches of loose paint on your walls driving you up a wall? If you’re looking to fix that without ruining the drywall underneath, you’re in the right place.
To start, grab a sharp chisel or a straight blade razor scraper. You’ll want to carefully cut along the loose paint edges, keeping your pressure just right so you don’t dig into the drywall. It takes some patience, but trust me, it’s worth it.
Once you’ve gotten that loose stuff off, the next step is sanding. Start with a coarser grit for those big areas and switch to a finer grit for a nice, smooth finish. Want an even cleaner edge? Try making a V indent along the paint line with a utility knife. It’s a little trick that makes a big difference!
After scraping and sanding, it’s time to tackle those gouges. A layer of Spackle will do the trick! Spread it on and let it dry.
Finally, when everything’s dried and smoothed out, you’ll want to prime and paint the wall. This step is crucial for a uniform appearance, so don’t rush it. For larger repairs, using a drywall texture sprayer can help you match textures more effectively and speed up the finishing process.
How to Fix Your Walls and Prepare Them After Paint Removal?
Ever looked at your walls after a paint job and felt like they still look rough? It can be pretty frustrating, especially after you’ve gone through the effort of removing loose paint. But before you slap on that fresh coat, you’ll want to make sure your walls are in top shape.
Start by scraping off any remaining caulk. This little step creates a clean area that makes all the difference. After that, grab an 80 grit sanding block to smooth out the high spots on the wall. It’s a bit of elbow grease, but it’s worth it.
Once you’ve sanded, apply a skim coat of drywall mud at the edges where you’ve removed paint. This will help blend the areas and make those pesky irregularities less noticeable. Let it dry thoroughly before moving on to the next step.
When it’s dried, it’s time for a final sanding with 100-120 grit sandpaper. You want to ensure the surface feels perfectly smooth to the touch. And trust me, this step really sets the stage for a professional-looking finish.
Before you break out the paint, always remember to prime the area you’ve treated. It seals the surface and improves adhesion, making the new paint adhere better and look more uniform. For an even better finish, consider applying a fast-drying spackle to fill small imperfections quickly and efficiently.
Best Practices for Achieving a Smooth Finish Before Repainting
Achieving a smooth finish before repainting is crucial if you want your walls to look spotless. Start by grabbing a utility knife to carefully cut around any loose paint. This creates a clean edge that makes your job much easier down the line.
Next, reach for a sharp scraper and remove that loose paint at about a 45-degree angle. This is key—make sure to apply even pressure to avoid gouging your drywall. After scraping, it’s time to sand the area with 80 grit sandpaper. This will help smooth out any imperfections you’ve uncovered.
What about those pesky gouges? Fill them with Spackle and let it dry completely. Once it’s dry, give it another sanding for that perfect smooth finish. If the surface still isn’t quite right, consider applying a skim coat of drywall mud. Finish it off with 100-120 grit sandpaper to ensure everything has a consistent texture before you dive into priming and painting.
Honestly, taking these steps really pays off when it’s time to see the final result. Using a no-sand spackle can speed up the process by allowing you to paint immediately after filling. So, are you ready to give your walls the makeover they deserve?
Frequently Asked Questions
How to Remove Loose Paint From Walls?
We’ve got paint removal techniques that’ll make you feel like an artist! Using heat guns or chemical paint strippers, let’s immerse ourselves in surface preparation steps, safety precautions, and even some wallpaper removal tips before repainting!
How to Remove Paint From Walls Without Scraping?
To remove paint from walls without scraping, we can use safe paint removers like eco-friendly options or vinegar solutions, heat gun usage for gentle softening, and effective paint removal techniques that won’t damage our surfaces.
What Is the Best Way to Remove Paint From Drywall?
When it comes to removing paint from drywall, we’ve discovered that the best paint removers and eco-friendly options, alongside effective drywall repair techniques, guarantee success. Using heat guns and safety precautions can prevent paint damage brilliantly!
Do I Need to Sand off All the Old Paint Before Repainting?
No, we don’t need to sand off all the old paint before repainting. Proper surface preparation and understanding paint types guarantee good paint adhesion, while addressing moisture issues and drywall textures during our repainting techniques and primer application.


