As an Amazon Associate, we earn from qualifying purchases. Some links on this site are affiliate links at no extra cost to you. Our recommendations are based on thorough research and editorial judgment.

Painting Over Caulked Seams: Getting Smooth, Crack-Free Lines
Have you ever stared at a freshly painted wall and noticed those pesky cracks where the caulk meets the surface? It’s frustrating, isn’t it? Getting smooth, crack-free lines when painting over caulked seams isn’t just a stroke of luck—it’s all about the prep work.
You may be interested


Start by giving the area a good clean with denatured alcohol. This step is crucial because any dirt or residue can mess with how the paint adheres. Next, it’s best to go with a high-quality caulk, like Geocel Painters Mate. Apply it in thin layers to minimize shrinkage; this is where a lot of people go wrong. Once you’ve got that sorted, let the caulk cure completely—24 to 72 hours is the sweet spot.
Now, before you dive into painting, don’t forget the primer! Using a reliable one, like Zinsser 1-2-3, can make all the difference. It prepares the surface and helps the paint stick better.
And when you pick your paint, opt for a flexible formulation. Why is this important? A flexible paint will expand and contract with temperature changes, reducing the chance of crazing and peeling.
So, what’s the takeaway here? With just a bit of preparation, you can avoid those annoying issues and achieve that professional finish. Remember, it’s all about patience and using quality materials. Are you ready to tackle those caulked seams with confidence?
Key Takeaways
- Allow caulk to fully cure for 24 to 72 hours before painting to prevent moisture-related issues and paint cracking.
- Apply a high-quality primer like Zinsser 1-2-3 to enhance adhesion and flexibility, reducing the risk of paint crazing.
- Use thin layers of caulk to minimize shrinkage, ensuring a smooth surface for painting and reducing the likelihood of cracks.
- Smooth caulk lines with tools or a soapy-water-dipped finger for a seamless finish before paint application.
- Consider using higher gloss paint for better flexibility over caulked seams, which helps prevent peeling and chipping.
Understanding Caulk: What You Need to Know

When you’re tackling home projects, have you ever noticed those pesky gaps and cracks around your skirting boards, windows, and doors? That’s where caulk comes into play. It helps fill those spaces and creates a tidy look overall. For neat application, you’ll want a caulking gun.
Now, here’s the trick: while caulk fills gaps, you actually shouldn’t sand it down for a smooth finish. This might sound strange, but different types of caulk serve different purposes. For instance, paintable silicone is fantastic for indoor use, while traditional silicone is better for wet areas like bathrooms — just keep in mind that it can’t be painted.
To get a great finish, apply thin layers of caulk. Trust me, this method helps ensure it dries properly and keeps your paint from cracking later on. So, why does this matter? Understanding caulk’s properties can make a huge difference in how your projects turn out. It’s your unsung hero for achieving those seamless, polished spaces everyone wants.
In short, caulk is more than just a filler; it’s a vital step in any home improvement job. Are you ready to give it a try? For optimal results, pairing caulk with the right adhesion primer helps ensure paint bonds well and resists cracking over time.
How Caulk Solves Common Painting Issues

Have you ever finished painting only to notice gaps and cracks ruining your fresh look? It’s frustrating, right? One trick that can help you achieve that perfect finish is using caulk. It’s a lifesaver when it comes to filling those annoying gaps and joints, keeping paint from seeping in or cracking over time.
Try this: grab a high-quality caulk like Geocel Painters Mate. It dries fast, meaning you can start painting within just a few hours. For anyone looking to wrap up a project quickly, that’s a big deal. The process is simple: apply the caulk properly to create a flexible barrier that can move with the material. This helps paint stick better and lowers the chances of it peeling or chipping later on.
Not only does caulk serve a practical purpose, but it also makes your work look professional. A neat application will give you that seamless appearance that can elevate your painted surfaces immensely. Honestly, who doesn’t love a clean, polished look?
The best part is — it’s easy to do! Just take a little time to apply caulk in your project, and you’ll be surprised at the difference it makes. Remember, it’s all about those small details that can transform your work from ordinary to extraordinary. So, are you ready to take your painting to the next level?
For optimal results, choose a caulk that offers quick paintability so you can apply paint in as little as 30 minutes after caulking.
Troubleshooting Paint Cracking Over Caulk?
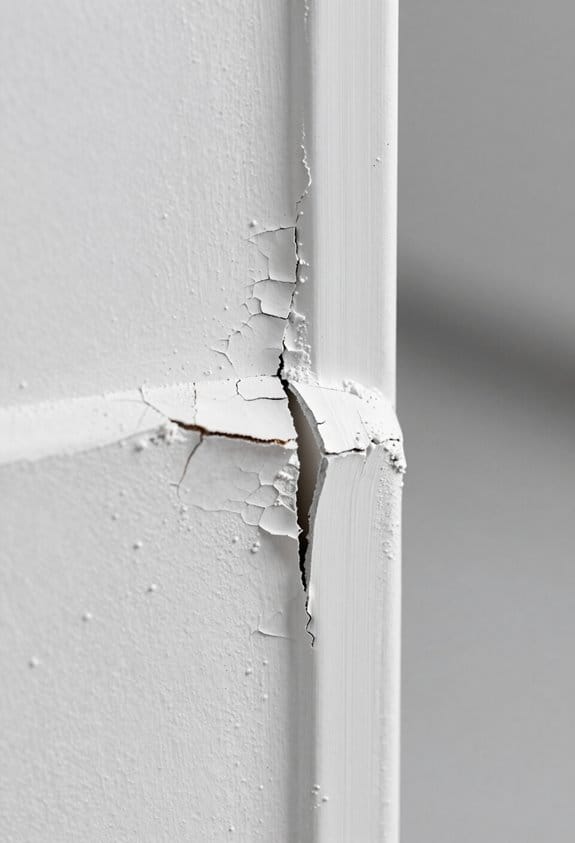
Have you ever painted over caulk only to find it cracked later on? It can be super frustrating, even if you’ve nailed your caulking technique. To help avoid this issue, make sure the caulk is fully cured before you even think about picking up that paintbrush. Give it a solid 24 to 72 hours to dry.
Also, if you’re using low-flexibility paint, you might notice crazing—basically, tiny cracks forming due to the paint not being able to move with the caulk. A higher gloss paint is usually a better choice, as it tends to offer more flexibility. Have you considered the size of your caulk bead? Larger beads can help minimize the chances of cracking—so it’s worth taking a moment to assess that.
Beyond that, think about using a good primer. Products like Zinsser BIN or 1-2-3 can really boost adhesion and help keep those cracks at bay. Don’t forget, applying your caulk in thin layers can minimize shrinkage and cracking, which gives your paint a stronger base to adhere to. Additionally, selecting a caulk known for its enhanced flexibility helps prevent cracking and improves long-term durability.
Why Drying Time Matters Before Painting
Have you ever rushed into painting only to regret it later? It turns out that giving your caulk enough time to dry is one of the most critical steps you can’t skip. When you’re prepping your surfaces, remember that caulk should dry for 24 to 72 hours, depending on what kind you’re using. Rushing this step is asking for trouble—moisture trapped in the caulk can lead to paint cracking or crazing later on, and nobody wants to see that!
As it dries, caulk actually shrinks a bit, which helps keep your paint from flexing unexpectedly when the temperature changes. So, take your time. Sure, it might feel like a hassle, but allowing that full drying time is key to getting a lasting finish. Also, don’t skimp on the paint. The better quality options can handle minor shifts in your surface better.
Here’s the trick: always check the manufacturer’s guidelines for drying times. This way, you set the stage for a smooth application you’ll be proud of. Why risk frustration over some extra waiting time? In the end, patience pays off. So, take a deep breath and let that caulk do its thing before you grab the paintbrush. Don’t you want your project to look amazing?
For added efficiency in your project, consider using a 12-inch mud pan to hold joint compound or plaster while working on the seams, as it offers an ideal balance between capacity and maneuverability.
Choosing the Right Caulk for an Impeccable Finish
Choosing the Right Caulk for an Impeccable Finish
Have you ever finished painting only to notice unsightly gaps and cracks? It can be frustrating, but the right caulk can make all the difference. When you’re diving into a painting project, it’s important to think about the surfaces you’re working with and the specific type of paint you’re using.
For most of your needs, acrylic latex caulk with silicone provides a great balance of flexibility and adhesion, ensuring a smooth finish. If you’re dealing with areas that see a lot of movement or wear, premium sealants are definitely worth considering—they significantly reduce the chances of your paint peeling or cracking over time.
Here’s the trick: always opt for a paintable caulk, like Geocel Painters Mate. This stuff makes it easy to apply a fresh coat without worrying about compatibility issues later on. And don’t forget this key point: let the caulk cure fully for 24 to 72 hours before you start painting. It sounds like a hassle, but it’s essential for that flawless finish.
Now, about those caulk beads—larger beads are actually better at accommodating movement. This simple tip can help ensure that your finished work stays crack-free for much longer. So why does this matter? Because a little attention to detail can really elevate the quality of your projects.
Also, consider the curing time of the caulk you choose, as it affects how soon you can paint over it without compromising the finish.
Techniques for Applying Caulk Like a Pro
Ever tried to caulk a joint, only to end up with a messy bead that makes your project look amateur? It happens to the best of us! But with a few simple techniques, you can apply caulk like a pro and get those clean, smooth lines we all crave.
First off, hold that caulk gun at a 45-degree angle. This is key for laying down an even bead along the joint. When you press the trigger, make sure to keep a steady pressure—this helps prevent those annoying gaps or blobs of excess caulk. No one wants to deal with that mess later!
Once you’ve applied the caulk, here’s a tip: grab a caulk finishing tool or your finger (dipped in some soapy water) to smooth it out. Take your time with this step; it makes a world of difference in the finished look. Oh, and don’t forget to clean the area first! Wiping it down with denatured alcohol or a water-based cleaner will help the caulk bond better.
So, why does all this matter? Because the last thing you want is for your caulk to peel or crack after you’ve put in all that effort. After you’re done, remember to be patient—wait about 24 to 72 hours for the caulk to dry before you start painting or doing anything else. It’ll be worth it when you see those professional-looking results.
In short, follow these steps to achieve a flawless finish, and you’ll be on your way to impressing everyone with your caulking skills. What project will you tackle next?
How to Spot and Fix Crazing in Your Paint
Have you ever put in tons of effort to create that sleek caulk line only to have it marred by crazing in your paint job? These pesky fine cracks can make your hard work look amateurish and are often the result of painting too soon over uncured caulk. Trust me, the last thing you want is to stare at your project and see a mess of spider web-like cracks.
To tackle this problem, make sure to give your caulk plenty of time to dry—overnight is ideal. Rushing the process by painting too soon is a common mistake many of us make. Another useful tip? Applying a high-quality primer, like Zinsser BIN, over the cured caulk can really help with adhesion and cut down on the chances of crazing showing up.
But what if you’ve already got crazing on your hands? The best thing to do is scrape off that damaged paint and fill in the cracks with a patch or filler to create a smooth surface. Once that’s done, you can repaint. This little extra work guarantees that your finish will be much cleaner and look more polished.
Using a paint sprayer with adjustable flow control can also help ensure an even application, reducing the risk of crazing caused by uneven paint thickness.
Recommended Products for Best Results
You know how frustrating it can be when your paint job doesn’t turn out as planned, especially around caulked seams. Choosing the right products makes a huge difference in getting the results you want. For a quick-dry option, give Geocel Painters Mate a shot—it’s ready for a second coat in just an hour. Need a solid base? Zinsser 1-2-3 primer is your best friend; it creates that strong adhesion and stability that’ll keep your paint looking fresh.
If you’re working in wet areas, like the bathroom or kitchen, Geocel Top Gun Frame Sealant has got you covered. It’s not only weather-resistant but also paintable, making it practical for those tricky spots. Want to speed things up a bit? Try Nemesis caulk for a super smooth finish—trust me, it can make all the difference in the look of your project.
And here’s a little tip: consider a high-quality paint with a gloss finish. This choice can cut down on cracks and provide the flexibility needed for everything to stay intact over time. For the best application results, using natural bristle brushes can help achieve smooth, even coats around seams and edges.
Tips for Achieving Seamless, Crack-Free Lines
Have you ever looked at a freshly painted wall, only to spot lines and cracks? It can be super frustrating, but don’t worry—there are ways to get those seamless, crack-free lines you dream of.
First things first: make sure your caulk is fully cured before you even think about painting. This usually takes 24 to 72 hours, depending on the brand, so be patient! After the waiting game, grab a high-quality primer. Applying it over the caulk isn’t just a good idea; it can really boost paint adhesion and cut down on cracking later on.
When choosing caulk, go for a paintable option like acrylic latex mixed with silicone. It’s all about flexibility! And when it comes to the paint, thicker options or paints with a higher gloss finish tend to resist cracks better.
Consistency is key in your application technique. Try applying a thin coat and feathering the edges—this helps create that seamless blend with surrounding areas. Ever notice how a little extra attention to technique can make a big difference?
For repairs on wooden surfaces around caulked seams, using paintable wood fillers can ensure an even, smooth base for painting and prevent future cracks.
Frequently Asked Questions
Can You Paint Over Cracked Caulking?
We shouldn’t paint over cracked caulking. Instead, let’s explore effective cracked caulking solutions and the right caulking types to guarantee a smooth, long-lasting finish that won’t lead to more issues down the line.
How to Get Smooth Lines When Painting?
Imagine a painter’s wand dancing gracefully along the canvas. To get smooth lines when painting, we must master brush techniques and precise tape application, ensuring our strokes flow seamlessly, avoiding any messy edges that disrupt our masterpiece.
How to Paint Over Caulk Without Cracking?
To avoid cracking when painting over caulk, we should guarantee proper caulk application and select the right paint. Using flexible caulk and a glossy finish paint helps maintain smooth lines and durability in our project.
What Happens if I Paint Over Silicone Caulk?
If we paint over silicone caulk, we risk losing its longevity; the paint won’t adhere well. Like a castle built on sand, our hard work could crumble, leading to peeling and a need for removal.


